
Whether you are a beginner setting up your first MikroTik router or an experienced network administrator, knowing how to connect to WinBox is a fundamental skill. In this guide, we’ll walk you through everything—from downloading WinBox to solving connection issues.
Introduction: Why Use WinBox?
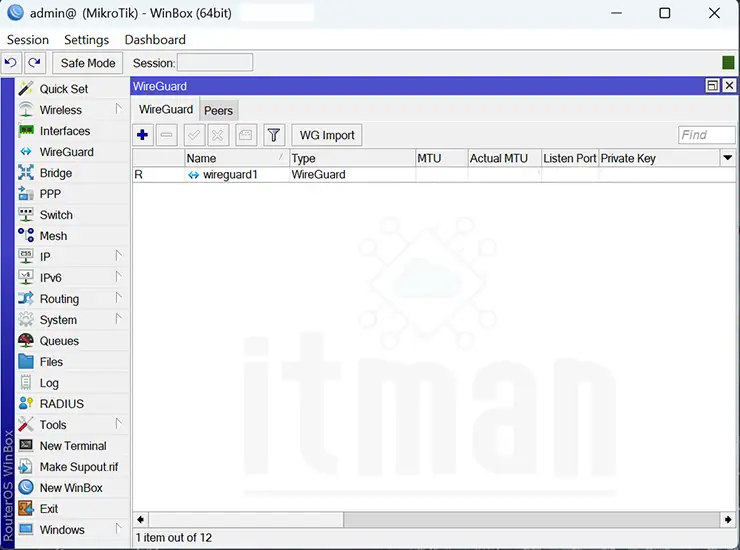
WinBox is MikroTik’s powerful and lightweight utility for configuring their routers via a GUI. While command-line interfaces (CLI) and WebFig offer alternative methods, WinBox remains the most popular due to its intuitive interface, real-time monitoring, and flexibility.
How to Connect to MikroTik Router Using WinBox : Step by Step
Step 1: Downloading and Launching WinBox
You don’t need to install WinBox—it’s a portable application.
👉 Download it directly from the official MikroTik website:
Look for the WinBox.exe file. Once downloaded, double-click to run it.
✅ No installation required. Just run and use.
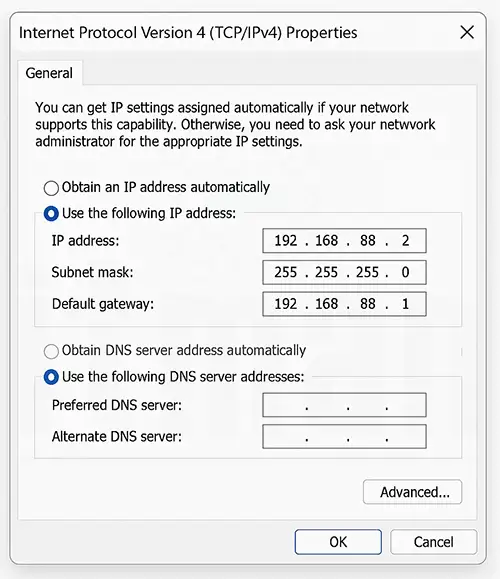
Step 2: Preparing to Connect
Before jumping into the GUI, make sure of the following:
- Connect your PC via Ethernet to one of the MikroTik router’s LAN ports.
- Your computer should be in the same subnet as the router.
Most MikroTik routers come with a default IP address:
If you’re connecting directly, you can set a static IP like:
Step 3: Connecting to the Router Using WinBox
Once everything is physically connected:
Method 1: Connect via MAC Address
WinBox automatically detects routers on the network using Layer 2 (MAC-based) discovery.
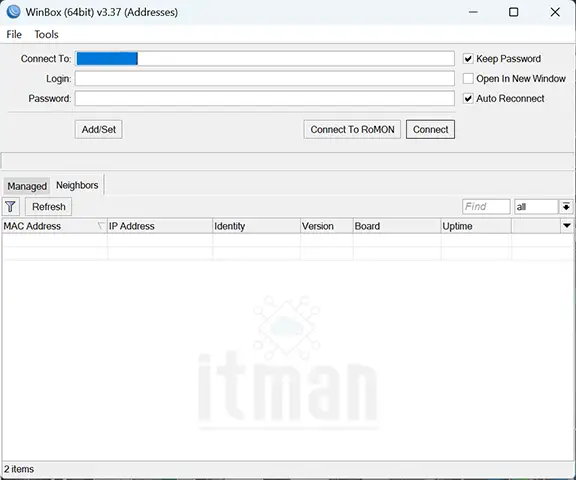
Launch WinBox.
Click the “Neighbors” tab to scan the local network.
Select the detected MikroTik router.
Leave the username as
adminand password blank (for default setup).Click Connect.
This method works even if IP settings are not properly configured.
Method 2: Connect via IP Address
If your router has a reachable IP address:
Enter the router’s IP (usually 192.168.88.1) in the Connect To field.
Enter username and password.
Click Connect.
This method is preferred when:
You are remotely accessing the router.
MAC address discovery is disabled.
Step 4: Changing Default Settings for Security
Once connected, you must secure your router:
Change the default password for user
admin.Create a new user with limited rights if needed.
Disable unused services like FTP or Telnet.
Configure firewall rules.
🛡️ Security Tip: Never leave the admin account without a password!
Step 5: Exploring the WinBox Interface
Now that you’re in, here’s what you’ll see:
| Section | Description |
|---|---|
| Quick Set | Overview and quick configuration |
| Interfaces | Manage Ethernet, WLAN, VLAN, etc. |
| IP > Addresses | Set IP addresses for interfaces |
| Bridge | Manage bridged interfaces |
| Firewall | Configure NAT, filter rules |
| System > Users | Manage users and permissions |
| Tools | Ping, Traceroute, Bandwidth Test, etc. |
Common Issues When Connecting to WinBox
❌ WinBox Doesn’t Detect Router
Possible reasons:
- Cable not connected properly
- Network adapter disabled
- Router is not powered on
❌ Can’t Connect via IP
Check:
IP configuration on your computer
Firewall blocking WinBox
Router has different IP
❌ MAC Connection Fails
Try:
Running WinBox as administrator
Disabling third-party firewalls
Checking Ethernet adapter status
✅ Pro Tip: Try using a different Ethernet cable or port if the router isn’t detected.
Advanced Tip: Save Your Session
Once connected, click on the “Save Session” checkbox. This will:
Remember your credentials
Auto-fill MAC/IP and username next time
Let you quickly reconnect to the same device
You can also export and import session files when managing multiple MikroTik routers.
Security Best Practices After Connecting
After you’ve successfully connected, take these steps to harden your MikroTik router:
- Change the default admin password immediately.
- Update RouterOS to the latest stable version.
- Disable unused interfaces and services.
- Set firewall rules to prevent unauthorized access.
- Limit WinBox access by IP address.
Use Cases for WinBox
- Initial router configuration for ISPs or office networks
- Wireless access point setup
- Bandwidth monitoring and traffic shaping
- Firewall configuration and NAT rules
- Remote troubleshooting (with secure access)
Comparison: WinBox vs WebFig vs CLI
| Feature | WinBox | WebFig | CLI |
|---|---|---|---|
| User-friendly | ✅✅✅ | ✅✅ | ❌ |
| Requires Installation | ❌ | ❌ | ❌ |
| Advanced Control | ✅✅✅ | ✅✅ | ✅✅✅ |
| Speed | Fast | Slower | Fast |
| Works via MAC | ✅ | ❌ | ❌ |
| Remote Access | ✅ | ✅ | ✅ |
Advanced Tips for Power Users
If you’re already comfortable with basic WinBox connection, here are a few advanced techniques to take your MikroTik game to the next level. These tips help you remotely manage, secure, and back up your router like a pro.
1. Remote Access to WinBox: How to Connect from Anywhere
Want to manage your MikroTik router when you’re away from the network? You can access it remotely via WinBox—but you must do it securely.
Steps:
- Assign a public IP address to your router (or use a dynamic DNS service like
cloud.mikrotik.com). - Enable WinBox access on WAN (not recommended unless fully secured).
- Create a firewall rule to allow WinBox port (default: 8291) only from specific IPs (e.g., your office/home IP).
- Use strong credentials and avoid using the
adminuser remotely.
Security Tip:
Always protect remote access with:
Strong, complex passwords
IP-based access control
Encrypted tunnel (e.g., VPN) if possible
Never expose port 8291 to the entire internet without proper filtering!
2. Automated Backups via WinBox
Setting a backup schedule ensures you’re never caught off guard. WinBox allows you to create and automate scheduled backups.
How to do it:
Go to System > Scheduler
Name:
auto-backupInterval:
1d(for daily backups)Start Time:
03:00:00(off-peak time)On Event:
Click Add, and set the following:
Backups will be saved in the Files section—you can download them via WinBox or FTP.
Pro Tip: Combine this with an automated script to send backups to a remote storage or email.
3. Secure WinBox Access Using IP Whitelisting
To make your WinBox access even more secure, limit access to specific trusted IP addresses.
Steps:
Go to IP > Services
Double-click on winbox
In the Available From field, enter allowed IPs:
Example:
192.168.88.0/24or203.0.113.25
This ensures that only devices from allowed IP addresses can connect to WinBox—even if someone guesses the password.
Combine this with Service Port change to move WinBox to a different port (for extra stealth).
With these advanced techniques, you’re not just connecting to your MikroTik router—you’re managing it like a pro. Whether you’re a network engineer or a serious home user, these steps give you more control, automation, and security.
Conclusion
Connecting to MikroTik using WinBox is the easiest and most efficient method to manage your router. It offers both power and simplicity, making it ideal for beginners and professionals alike. From setup to security, WinBox helps you take full control of your MikroTik device.
Whether you’re troubleshooting your home network or configuring a complex enterprise setup, understanding how to connect to WinBox gives you a serious advantage.
FAQs
1. What is the default IP of MikroTik router?
Usually, it’s 192.168.88.1.
2. What is the default WinBox login?
Username: admin – Password: (blank)
3. How do I connect to WinBox without IP?
Use MAC address connection from the Neighbors tab.
4. Is WinBox available on macOS?
No, but you can use Wine or WebFig as an alternative.
5. How can I reset my MikroTik router?
Press and hold the reset button for 5-10 seconds while powering on.
6. What if WinBox doesn’t find my router?
Check cables, disable firewalls, or use another PC.
7. Can I use WinBox over the internet?
Yes, but it must be securely configured (VPN or firewall rules recommended).
8. Is it safe to leave admin with no password?
Absolutely not. Always set a strong password.
9. How can I back up my settings?
Go to Files, click “Backup”, and download the .backup file.
10. How to update RouterOS via WinBox?
Go to System > Packages, click “Check for Updates”, then download & reboot.
Download the Free WinBox Quick Start Guide
Want to connect to your MikroTik router with WinBox in just a few minutes?
Click below to download your free guide now:
👉 Download WinBox Quick Start Guide (PDF)