
Virtual Local Area Networks (VLANs) are one of the most essential features in modern networking. They allow you to segment a physical switch into multiple logical networks, which improves security, reduces broadcast domains, and makes network management more efficient. For IT teams, businesses, and even medium-sized offices, understanding how to configure VLAN on Cisco Switch is a fundamental skill.
In this article, you will learn step by step how to configure VLAN on Cisco Switch, from creating VLANs and assigning ports, to configuring trunk links and verifying your setup. By the end, you will be able to perform VLAN configuration on your own or rely on a professional service. Our team of technicians is also available if you prefer expert setup and maintenance for your Cisco network.
What is a VLAN?
A VLAN is a logical grouping of devices within a Layer 2 network. Even if devices are connected to the same physical switch, VLANs allow you to separate traffic into isolated networks. For example, you can have one VLAN for management, another for staff, and a third for guests.
Benefits of VLANs include:
- Reduced broadcast traffic
- Improved security and isolation
- Better resource management
- Easier troubleshooting and monitoring

Prerequisites Before VLAN Configuration
Before you configure VLAN on Cisco Switch, make sure you have:
- A Cisco Catalyst switch or similar IOS-based switch
- Console or SSH access to the device
- Proper privileges (privileged EXEC mode with enable password)
- A network plan for VLAN IDs, IP ranges, and port assignments
Configure VLAN on Cisco Switch : Step by Step
Step 1: Access the Cisco Switch
You can access the switch using:
- Console cable and terminal emulator (like PuTTY or TeraTerm)
- Telnet or SSH (if already configured)
Once connected, enter privileged mode:
Step 2: Create VLANs
To create a VLAN, you must enter global configuration mode:
Repeat this process for each VLAN you want to create:
Step 3: Assign VLANs to Access Ports
After creating VLANs, you need to assign them to specific ports. For example, to assign VLAN 10 to interface FastEthernet 0/1:
You can apply the same for VLAN 20:
Step 4: Configure Trunk Ports
Trunk ports carry traffic for multiple VLANs. These are usually uplink ports to other switches or routers.
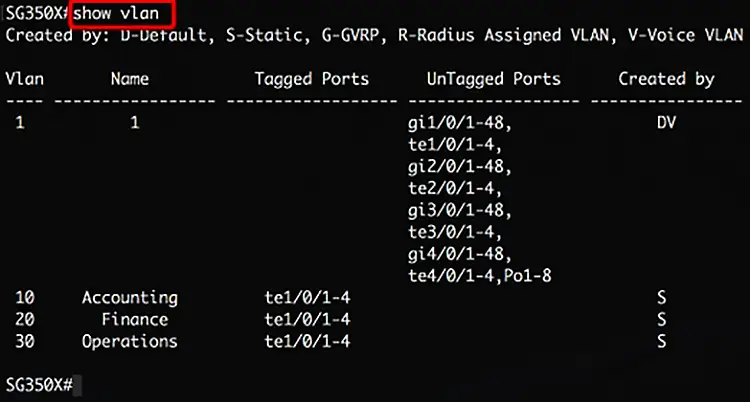
Step 5: Verify VLAN Configuration
You can check VLAN status with:
This command shows all VLANs configured and which ports are assigned.
For trunk verification:
Switch
Step 6: Assign IP Addresses to VLAN Interfaces (Optional)
If you want to manage the switch remotely or perform inter-VLAN routing with a Layer 3 switch, configure IP addresses:
Common Mistakes in VLAN Configuration
- Forgetting to set switchport mode access before assigning VLAN
- Not enabling trunk mode on uplink ports
- Assigning the same VLAN ID to multiple conflicting purposes
- Forgetting to save configuration with
write memoryorcopy run start
Advanced VLAN Configuration Concepts
- Native VLAN: On trunk ports, Cisco requires a native VLAN for untagged traffic.
- Voice VLANs: Special VLANs optimized for IP telephony.
- Private VLANs: For isolating devices at Layer 2.
Practical Use Cases
- Corporate Office: VLAN 10 for staff, VLAN 20 for guests, VLAN 30 for management.
- Educational Institute: VLANs for students, teachers, and administration.
- Retail Store: Separate VLANs for POS terminals, Wi-Fi, and CCTV.
Example Configuration Script
! Assign VLANs to access ports
interface fa0/1
switchport mode access
switchport access vlan 10
interface fa0/2
switchport mode access
switchport access vlan 20
! Configure trunk
interface fa0/24
switchport mode trunk
switchport trunk allowed vlan 10,20
Configure VLAN on Cisco Switch : How Our Technicians Can Help
While it is possible to configure VLAN on Cisco Switch by following these steps, many businesses prefer expert assistance to avoid downtime. Our certified technicians can:
- Plan VLAN structure based on your network needs
- Configure VLANs, trunk ports, and routing
- Provide on-site or remote support across Dubai and the UAE
- Offer maintenance contracts to keep your network stable
If you need professional configuration, contact our team for immediate support.
Conclusion
Configuring VLAN on Cisco Switch is a fundamental networking task that enhances performance, security, and manageability. By following this step-by-step guide, you can create VLANs, assign them to ports, configure trunk links, and verify your setup. For businesses that require reliable, zero-downtime configuration, our professional technicians are available to provide expert setup and ongoing support.
With proper VLAN segmentation, your Cisco switch becomes a powerful tool for organizing and securing your network.
FAQ : Configure VLAN on Cisco Switch
- What is the default VLAN on a Cisco switch?
The default VLAN is VLAN 1, which is enabled on all ports by default. - Can I delete VLAN 1?
No, VLAN 1 cannot be deleted, but you can avoid using it for security reasons. - How many VLANs can be configured on a Cisco switch?
Most Catalyst switches support up to 4094 VLANs. - What is the difference between access and trunk ports?
Access ports carry traffic for one VLAN only, while trunk ports carry multiple VLANs. - Do I need a router for inter-VLAN communication?
Yes, unless you are using a Layer 3 switch with routing capability. - What happens if I forget to assign a port to a VLAN?
It remains in the default VLAN (usually VLAN 1). - Can VLANs improve network security?
Yes, VLANs isolate traffic, making it harder for unauthorized users to access sensitive data. - How do I save VLAN configuration permanently?
Use the commandcopy running-config startup-config. - Can VLANs span multiple switches?
Yes, by using trunk ports, VLANs can be extended across multiple switches. - Is it possible to configure VLANs remotely?
Yes, if the switch has an IP configured and is reachable via Telnet or SSH.