
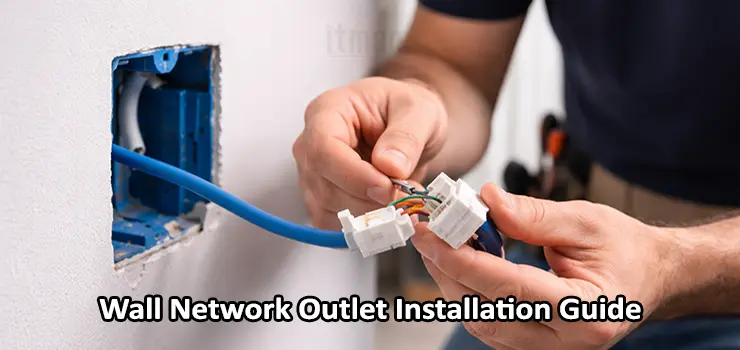
Wall Network Outlet Installation is one of those tasks that looks simple at first glance but directly affects the long-term stability, speed, and reliability of a wired network. A poorly installed RJ45 wall outlet can introduce packet loss, intermittent disconnects, reduced link speed, or troubleshooting headaches that are difficult to trace later. This guide is written to be practical and experience-based, not a checklist-style tutorial. By the end, you will clearly understand how to install an RJ45 keystone wall outlet correctly, why each step matters, and how to avoid common mistakes that even experienced installers sometimes make.
Understanding the Role of a Wall Network Outlet in Modern Networks
A wall network outlet is not just a cosmetic endpoint. It is a permanent termination point between structured cabling inside walls and active devices such as switches, routers, access points, IP phones, or computers. In professional environments, Wall Network Outlet Installation is treated as part of the structured cabling system, not as an afterthought.
Unlike patch cables, in-wall Ethernet cables are not meant to be moved, bent frequently, or re-terminated often. The RJ45 keystone jack acts as a stable interface that protects the cable, maintains proper twist integrity, and ensures consistent electrical characteristics. When done correctly, Wall Network Outlet Installation allows the network to operate at its full rated speed, whether that is 1Gbps, 2.5Gbps, or even 10Gbps depending on cable category and hardware.
Choosing the Right Cable and Keystone Before Installation
Before touching tools or opening walls, the success of Wall Network Outlet Installation largely depends on selecting compatible components. The cable category and the RJ45 keystone must match or exceed the network’s design requirements. For residential and small office networks, Cat6 is usually the minimum recommended standard. Cat6 provides better noise resistance and future-proofing compared to Cat5e. In environments where higher speeds or longer cable runs are expected, Cat6A is a safer option. The keystone jack must explicitly support the same category. Using a Cat6 cable with a Cat5e keystone undermines performance and defeats the purpose of structured cabling.
Shielded cables add another layer of complexity. If you are using shielded twisted pair cable, the keystone, wall plate, and grounding strategy must all support shielding. Otherwise, improper termination can introduce more interference instead of reducing it. For most indoor installations, unshielded Cat6 is simpler and more forgiving during Wall Network Outlet Installation.
Planning the Wall Network Outlet Location
Location planning is often underestimated. A well-planned Wall Network Outlet Installation considers both current and future needs. The outlet should be placed where network devices are likely to remain, such as near desks, behind TVs, next to access point mounting positions, or close to network racks.
Height also matters. In offices, outlets are usually installed at standard electrical outlet height for accessibility and cable management. In homes, outlets behind TVs or workstations are often placed slightly higher to avoid furniture interference. Avoid locations near power lines, fluorescent lighting ballasts, or heavy electrical equipment, as electromagnetic interference can degrade signal quality over time.
Preparing the Cable Inside the Wall
Once the location is confirmed, the cable should be routed carefully to the outlet box. Excessive pulling force during installation can damage the internal twists of the Ethernet cable, even if the outer jacket looks intact. During Wall Network Outlet Installation, maintaining cable integrity is critical. Leave enough slack behind the wall plate to allow future re-termination if necessary. A common professional practice is to leave a gentle service loop rather than cutting the cable flush to the box. Sharp bends should be avoided, and the cable should never be kinked. The minimum bend radius should be respected to preserve signal performance.
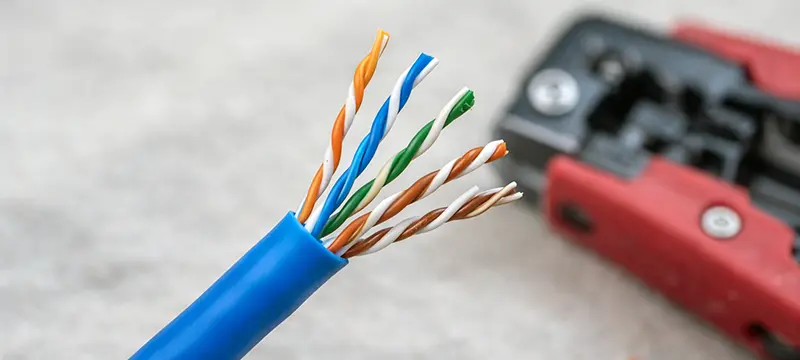
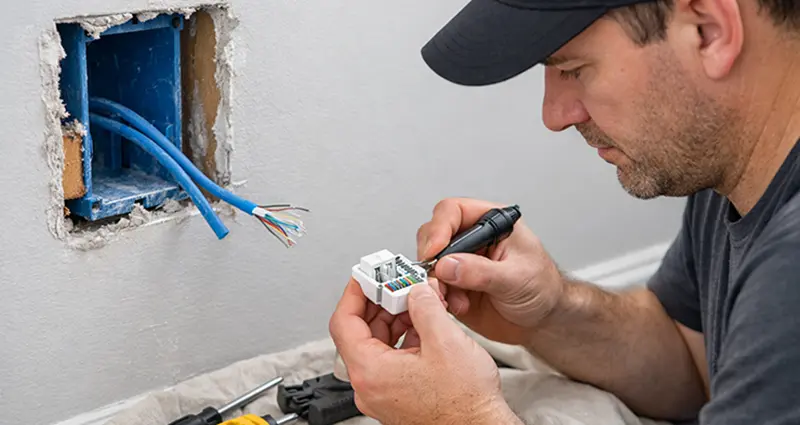
Stripping the Cable Jacket Correctly
Stripping the outer jacket is one of the most sensitive steps in Wall Network Outlet Installation. Removing too much jacket exposes untwisted pairs, while removing too little makes termination difficult. The goal is to expose just enough of the internal wires to seat them properly in the keystone jack. Care should be taken not to nick or cut the insulation of individual conductors. Even small damage can cause long-term reliability issues. Many installers use specialized cable strippers designed for Ethernet cables, but a steady hand and a sharp blade can also work when used carefully.
Understanding T568A and T568B Wiring Standards
RJ45 keystone jacks are wired according to standardized color codes. The two most common standards are T568A and T568B. From a performance standpoint, there is no difference between them as long as the same standard is used consistently at both ends of the cable. In most commercial installations, T568B is more common, while T568A is often preferred in government or residential settings in some regions.
During Wall Network Outlet Installation, consistency is more important than the specific standard chosen. Mixing standards on the same cable results in a crossover, which can cause connectivity issues depending on the connected devices. The keystone jack usually has color-coded guides printed on it. These guides show exactly where each wire should be placed. Following these guides precisely ensures correct pinout and reliable connections.
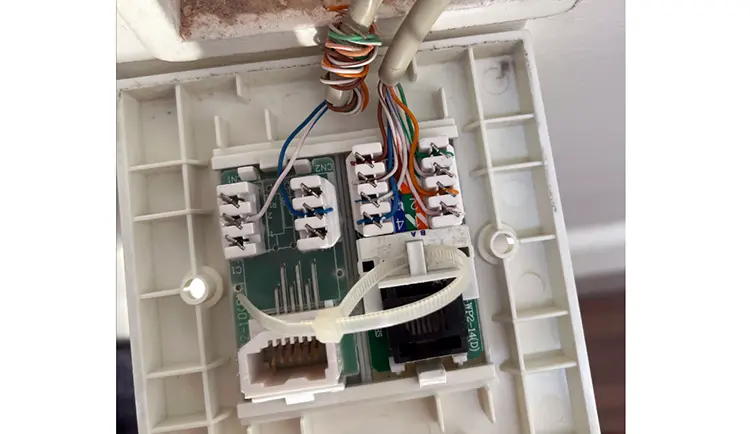
Seating the Wires into the Keystone Jack
Once the wiring standard is selected, the individual conductors are placed into their designated slots on the keystone jack. This step requires patience and precision. Each wire should be fully seated in its channel without excessive untwisting. Maintaining the twist as close as possible to the termination point is essential. Excessive untwisting increases crosstalk and degrades performance.
Professional Wall Network Outlet Installation aims to preserve twists up to the point where the wire enters the jack. After positioning the wires, a punch-down tool is used to seat and cut them simultaneously. The tool must be oriented correctly to avoid cutting the wrong side of the conductor. A clean punch ensures a solid electrical connection and mechanical stability.
Securing the Keystone into the Wall Plate
After termination, the keystone jack is snapped into the wall plate. It should fit securely without excessive force. If it feels loose, the wall plate or keystone may be incompatible. The wall plate is then mounted onto the wall box. During Wall Network Outlet Installation, the cable should be gently folded inside the box rather than forced. Pinched cables behind the plate can lead to intermittent faults that are difficult to diagnose later. Once mounted, the outlet should sit flush with the wall, providing a clean and professional appearance.
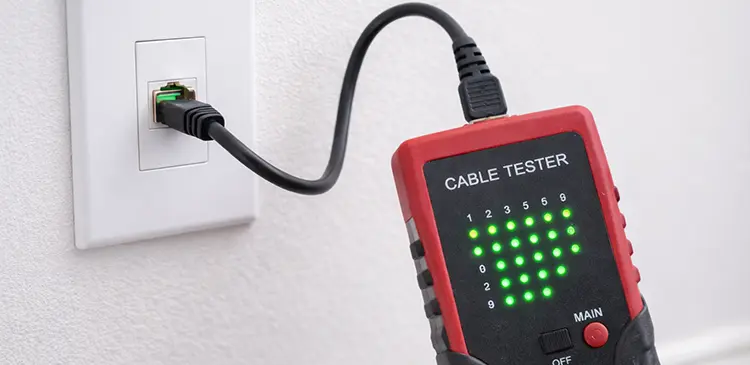
Testing the Wall Network Outlet After Installation
Testing is not optional in professional Wall Network Outlet Installation. Even if the outlet looks perfect, hidden wiring errors can exist. A basic cable tester can verify continuity and correct pinout. More advanced testers can measure cable length, detect split pairs, and evaluate signal quality. Testing should be performed before connecting active network equipment. Identifying and fixing issues at this stage saves time and prevents unnecessary troubleshooting later. If a fault is detected, re-terminating the keystone is often faster and more reliable than attempting partial fixes.
Common Mistakes in Wall Network Outlet Installation
One frequent mistake is untwisting pairs too far back from the termination point. Another is mixing wiring standards on opposite ends of the cable. Using low-quality keystone jacks or wall plates can also undermine an otherwise careful installation.
Over-tightening wall plates, crushing cables inside the box, or installing outlets too close to electrical wiring are additional issues that reduce long-term reliability. Wall Network Outlet Installation is as much about avoiding these subtle errors as it is about following the correct steps.
Wall Network Outlet Installation in Residential vs Commercial Environments
In residential settings, Wall Network Outlet Installation often focuses on aesthetics and convenience. Outlets are placed discreetly, and cable counts are lower. However, the same technical principles apply. A home office or smart home system depends on reliable cabling just as much as a corporate network.
In commercial environments, scalability and documentation become more important. Each outlet is typically labeled, tested, and recorded. Future expansions or troubleshooting rely on accurate records. Professional installers often treat Wall Network Outlet Installation as part of a broader network infrastructure strategy rather than a standalone task.
Long-Term Maintenance and Future Upgrades
A properly installed wall network outlet requires minimal maintenance. However, future upgrades may involve replacing keystone jacks to support higher cable categories or different network standards. Leaving sufficient slack and using standard wall boxes simplifies these upgrades. Wall Network Outlet Installation done with foresight allows networks to evolve without major structural changes. This is particularly important in offices where downtime and renovation costs are high.
Professional Wall Network Outlet Installation Service in Dubai
For clients who prefer a hands-on professional approach, we provide on-site Wall Network Outlet Installation services across Dubai. Our experienced technicians handle everything from cable routing and RJ45 keystone termination to final testing and cleanup. Whether it is a home, office, shop, or commercial space, the technician comes fully equipped to ensure the installation is done cleanly, correctly, and according to structured cabling standards. This service is ideal for anyone who wants a reliable wired network without dealing with tools, wiring details, or troubleshooting, while ensuring the installation is future-ready and professionally finished.
Final Thoughts on Wall Network Outlet Installation
Wall Network Outlet Installation is a foundational element of any wired network. While it may seem minor compared to switches or routers, its impact on performance and reliability is significant. A careful, methodical approach ensures that the network operates at its intended capacity and remains stable over time.
By understanding the reasoning behind each step, from cable selection to testing, you move beyond simply following instructions and begin installing with intent and confidence. Whether the project is a single room or an entire building, mastering Wall Network Outlet Installation pays dividends in network quality and long-term peace of mind.